
If you’ve spent any amount of time around Primal Mobility, chances are you’ve heard me talk about the power of hanging. Or have experienced it within your programming from time to time. It’s no secret that I’m obsessive (It’s a healthy obsession though) about hanging and the benefits it can provide.

I want to share insight into this magical exercise by discussing the anatomy of the hang and the carry over to mobility, decompression of the spine, grip strength and more. It is a lengthy read, hopefully I can keep you with me! The information is broken up into relatable chunks if you need to skip ahead or take more time to digest.
Let’s dive in!
Overhead Mobility
Bring your hands directly out in front of you, and then reach for the ceiling. Are you able to move your arms directly overhead (allowing the arm to pass your ear line) without relying on the lumbar spine to extend? One of the most common compensations for restricted shoulders/thoracic is to extend through the low back when reaching overhead. If the answer to the question was “yes”, are there any changes when you load that overhead position?
Putting a barbell overhead is very common in the world of weightlifting and crossfit (not to mention handstand pushups). These movements require you to genuinely “own” that overhead position. Regardless if efficient overhead loading is one of your mobility goals, hanging can be a tool to long-term shoulder health.
At Primal, we frequently discuss that to become more comfortable in a position, you need to spend more time within it. In order to be more comfortable in your squat, you need to spend more time within a squat. Familiarizing your body with the ranges of motion required to perform that movement pattern. There is no difference when it comes to the overhead position. Depending on your level of restrictions, bringing your shoulders actively overhead can be extremely challenging, but there are options.
Hanging provides the opportunity to slowly acclimatize your shoulders, scapula and surrounding musculature to this position. Giving you more freedom and allowing the overhead position to become available in an active manner. Basically, if our body doesn’t feel certain ranges of motion are necessary, it won’t provide them to us. Spending more time in the positions we want to improve communicates to our body a level of requirement from the ranges.
So what type of hanging might be best for you and your current situation?
Hanging Techniques
Depending on what you’re struggling with, where you’re at in your journey, and what your goals are, there are hanging techniques that can help you get there. Information behind each technique and how to apply can be found below.
The Dead Hang
The first logical stop when looking to improve overhead mobility is to gain more ROM (Range of Motion) opportunity with a passive approach. This doesn’t mean this is the best technique for you, let me explain. The shoulders are an incredibly natural mobile joint. No other joint in the body provides as many movement capabilities. An anatomical view provides the perspective that the Glenohumeral joint is connected similar to a golf ball on a tee.


Without getting too “sciency”, this joint requires some level of tension to remain intact. If you have hypermobile shoulders, the Dead Hang would be counterproductive for you. For context, I am someone who has a history of many shoulder dislocations. This means I struggle more with lack of tension than I do with restrictions and would not benefit as much from this style of hanging.
The Dead Hang is best suited for those struggling with restrictions in the surrounding musculature (most commonly the lats). The deadhang allows the shoulders to creep up to the ears and ribs sink down to the floor and the lower body acts as a form of loading, applying more gravitational pull. No movement is required, just let the stretch sink in while focusing on deep breathing through the diaphragm. If you’re feeling tight in the upper body and need a good stretch OR need to release some compression in your spine, this is the technique for you! Plus, all you need is a pull up bar!
The Active Hang
The Active Hang is a bit more complex and challenging. The concept is to pull your scapulas into your back pockets and hold that position for an extended period of time. Considering the information provided above, this is a great technique for those who have limited shoulder and scapular stability. Which can be the cause of shoulder injuries. The Active Hang is a form of straight arm, scapular strength work, also a great tool to implement in the protocol!

The Dynamic Hang
We can now apply both concepts above and challenge our shoulders and scapula in many different ways. The Dynamic Hang technique can be used once the shoulders are prepared to manage a higher level of demand. Dynamic Hang work includes various applications of stimulus such as scap pull ups, gentle kipping motions, single arm transitions, etc. When your hanging mechanics are prepared for it, this is an effective way to warm up the overhead position for a workout.
Grip Positioning
By far the most common question I get about hanging is where to place the hands. I’m personally a big fan of mixing it up as frequently as possible and placing a larger focus on whatever feels right at the moment, but certain grips will place different stimuli on the body.
Pull-up (pronated) Grip
The pull-up grip (overhand grip) is one that carries over to training the most effectively. If you imagine hanging from a straight bar with your palms facing forward, it is very similar to the position your arms and hands are in when holding a barbell overhead. Although holding a barbell overhead and hanging are almost complete opposites as one is applying pressure down on you while the other is applying pressure up and away from you, the positioning is the same. In the past you may have heard me say, “spend more time in the positions you want to improve”. This is a great example of that! If you want to improve a strict overhead position that will have a very effective carry over to getting a barbell overhead, this is a great grip to work with!
Chin-up (supinated) Grip
If your lats are tight, listen up! The function of the lats is to internally rotate, and extend (bring arms behind your back) the shoulders. When this muscle is tight it will naturally pull your shoulders into an internally rotated position and cause a reduced amount of stability in the shoulders as well as your ability to get your arms into a strong overhead position. Sounds kind of problematic doesn’t it?
One of the best ways to address tight lats would be to apply the Chin-up grip with your hang work. As you grab a bar overhead with your palms facing behind you, your shoulders will naturally be forced into an externally rotated position, which lengthens your lats.
The downside to this grip style is that it can place more stress on the elbows if you have poor wrist or shoulder rotation ability. If this is the case, you can slowly work it into your protocol.
Neutral Grip
The neutral grip isn’t always an option, especially if you’re hanging on a straight bar as it has your palms facing each other during the hang. Having your hands in this position allows this to be by far the most simple and approachable way to get started with hanging. As it doesn’t challenge much rotation of any kind, it will keep the shoulders in a more neutral position which naturally applies less stress (remember that stress isn’t always a bad thing) to the shoulders. If you’re just getting started and have a history of shoulder pain or injuries, this is the best place to start your hanging journey. Once you’re comfortable with a neutral grip you can start playing around with your grip options!

The Protocol
Hanging is a beautiful and simple way to restore function and health in the shoulders. With that said, it can also be very intense and uncomfortable if your shoulders aren’t prepared for it yet. This is why, when looking at building up a hanging protocol, we approach it with a perspective of accumulation rather than an “all in one set” frame of mind. For example, for a complete beginning I would suggest starting by accumulating 60-90 seconds of hanging per day in 10-15 second intervals. That can be 9 sets of 10 seconds or 6 sets of 15 seconds. This type of approach will have the individual hanging more frequently which helps them get their hands in and out of the overhead position more times throughout the day.
Once the individual has more ability in their shoulders and the hanging doesn’t cause discomfort (intensity can still be present, but no pain), we can start increasing the total time hanging and longer sets as well. We continue on this path until we reach an accumulated time that makes sense with their goals.
The discussion around programming protocols is a challenging one as it is so nuanced and specific to an individual but the concepts can still be simple if you let them be. Just spend more time hanging, play around with different grip positions, and work up to a point that helps you achieve what you need from the exercise!
Example Protocol
Week 1-2: Accumulate 60 sec Dead Hang + 30 sec Active Hang, in 15 sec intervals
Week 3–4: Accumulate 90 sec Dead Hang +30 sec Active Hang, in 20 sec intervals
Week 5-8: Accumulate 90 sec Dead Hang + 60 sec Active Hang + 30 sec Dynamic Hang, in 30 sec intervals
Week 9-12: Accumulate 4-7 mins in max hang intervals, switching from Dead Hang, Active Hang, and Dynamic Hang each set.
As you can see it should be very simple and slowly progressive. You may have noticed that I don't give any insight into what grip positioning to use and that is done purposely. I believe that the grip position should be relative to what feels best and hanging should be a practice of discovery. Play around with various types of hang placements and spend more time in those that feel best! If pain or discomfort is present you will progress at a slower pace and if you’re starting at a more advanced level you can begin with more volume applied.
Since we now have a better understanding of how to hang, let’s dive deeper into why we would hang by looking at the anatomy of the hang.
Anatomy of the Hang
This next part may seem a little dry, but I encourage you to keep reading as it’s interesting! I’ll try to keep it brief.
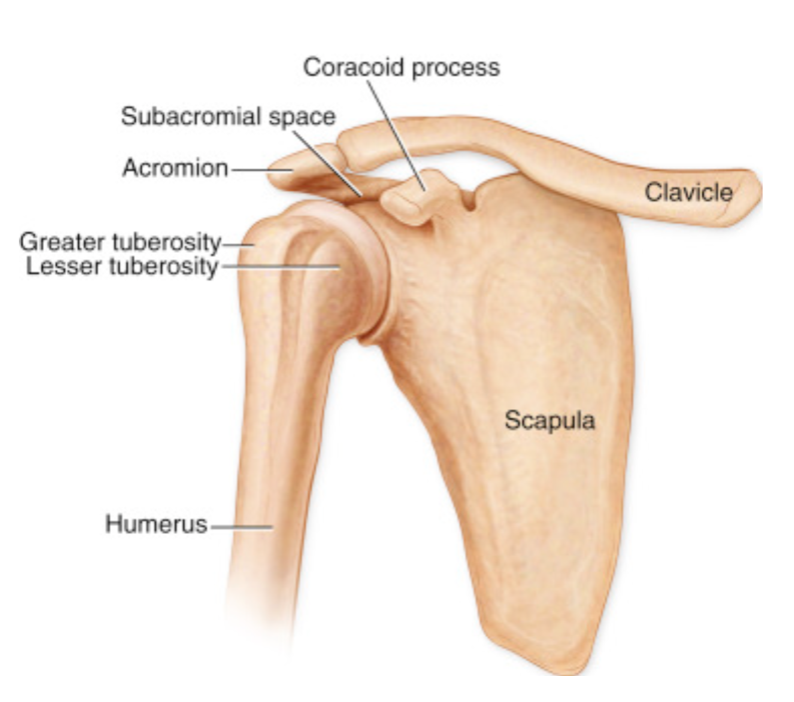
The scapula is often seen as this simple, flat, wing-like bone on the back. However, there are two boney pathways (using the term pathways because I have no idea what else to call it) that lead off of it. These pathways, named the Acromion and Coracoid Process, allow a greater connection to the shoulder joint. This section of the scapula creates somewhat of an arch and is connected by the Coracoacromial Ligament. Below that arch is the Subacromial space. As we move our arms into an overhead position, this space is filled by the head of the humerus. This is how the Coracoacromial ligament and other rotator cuff tendons can get caught and inflamed, resulting in an impingement. Here’s the magic, hanging creates more space within the Subacromial space. Allowing the shoulders to perform as needed in an overhead position without compromising tendons and ligaments. This is all a fancy way of saying that hanging creates more space in the shoulders and allowing extra stuff surrounding it to work better.
A hanging position also provides you an opportunity to target one of the most commonly restricted muscles that limit shoulder flexion, the lats. The lats are a massive muscle, originating from the lower and middle spine to insert at the upper humerus bone. Basically, the muscle starts at the lower and middle spine, attaching to the upper arm bone near the shoulder. Improving the function of the lats through range of motion work allows more movement options in your overhead position. It also improves shoulder extension, think of positioning in a close grip bench press, dip, or even front rack.
An Interesting Study
This part is pretty biased as I haven’t found a lot of information on the negative results of hanging, and I’m clearly a big fan. In 2012 Dr. John Kirsch, an orthopedic surgeon and author from Wisconsin, conducted a study with 92 subjects suffering from chronic shoulder pain. He found that 90 out of 92 participants were able to return to comfortable living after implementing a daily hanging protocol.
Dr. John Kirsch based his life's work on exploring the power of hanging and educating others through his book; which you can find here Shoulder Pain? The Solution & Prevention. There are countless other Physical Therapists, Chiropractors, Coaches, etc., who apply the benefits in their practice and training as well.
What it comes down to is giving your body the opportunity to create more movement options for yourself. Our bodies are extremely efficient, getting rid of ranges that aren’t needed. In society's growing level of sedentarism, getting our hands up and reaching overhead is a rare requirement and our body will respond to that appropriately.
The fitness industry is a strange place filled with promises of miracle quick fixes. Miracle teas, miracle juice cleanses that pressure wash your colon, and miracle 5-minute booty blast workouts guaranteeing you'll look like a Kardashian. Hanging truly might be the miracle fix for shoulder health, no credit card required.
#bemoreprimal
-Coach Matt

